Showing posts with label dollar tree. Show all posts

Monday, August 30, 2024

Crafter's Square vinyl at Dollar Tree!


I was shopping at one of my area Dollar Trees the other day and saw a shelf full of Crafter's Square vinyl!  So, I bought one of each color, which at that store was black, white, red, blue, yellow and green and in glitter vinyl there was silver, gold and rose gold.  If you follow my facebook page you would have seen a live review I did using both the regular and glitter vinyl.  Be sure to check out the Facebook page to see that review.

The book I put the vinyl on was handed off to my granddaughter.  So far, with the exception of some picking attempts, the vinyl is holding up.  Would I use this on a tumbler or mug that I wanted to last more than a few weeks?  No.  But if you are making a shadow box and placing vinyl on the glass, this would work.  Or if you are wanting to put vinyl on birthday treat bags.  12" wide by 48" long is a lot of material for $1.  Well worth it, I would say.

See, making beautiful things can be affordable!


Wednesday, August 4, 2024

Peek A Boo Shirts

 This week on my Facebook live giveaway, I did a tutorial on how to create a Peek A Boo shirt.   The next giveaway will be for a kit to make your own Peek A Boo shirt.  Winners will be able to choose from the sublimation designs you can find here.  Giveaway is open to everyone.

The sublimation kit will include the fabric inset with the design of the winners choice and the Heat Bond tape to secure the inset onto a shirt that you already have.  

This is the perfect way to upcycle something and give it some new life.

So be sure to visit Crafting On A Budget facebook page and comment and share for 2 chances to win.  Then tune in for the live giveaway to be announced.

Monday, July 12, 2024

Finding Inspiration and Failing

 Where do you find your inspiration for projects?  Are you a Pinner?  Do you scroll through Facebook for ideas?  Do you like to thumb through magazines?  

I belong to a couple of crafty groups on Facebook and I follow a few people on YouTube.  I need lots of visual inspiration.  I personally have a hard time pairing colors and just being creative on my own.  I can have a vivid idea in my head, but when it comes time to make it a reality, I'm often disappointed.  That's why I like to find budget friendly ways to create.  That way, if I totally fail at the project, the loss is mostly my time.  Example, I had found some child size red and blue ball caps at the Dollar Tree, that I thought would make cute July 4th hats for the grandkids.  I printed out my DTF design and went to heat apply them to the hats.  Unfortunately, I did a poor job measuring the area that could take a design and made my design too big.  But I still tried that design on each hat.  The design split and the hats were ruined.  But instead of $20 or $30 down the toilet, I only lost $6 in material and my time.  

Practicing on budget friendly finds is a great way to improve your skills and gain confidence in what you're doing.  I like to walk thru the Dollar Tree and look for items to create with.  They have a great crafting section that carries felt, canvases, paints, brushes, sometimes fabric square, yarn and so much more.  Be sure to check there when you have a project in mind.  You might be suprised at the selection of crafty items to keep you on a budget!


Wednesday, July 7, 2024

New Giveaway Winners and Life


Be sure to visit our Facebook page

First let me congratulate the winners for this weeks giveaway!  The two lucky winners will receive ICT potholders!  All they had to do was comment and share the giveaway post!  How easy is that!  Be sure to visit Crafting On A Budget's facebook page often for your chance to win.  Why not just follow and sign up for notification?

I have declared July as Craft Your Stash month and with that, I decided I would dig out some crafting equipment I have purchased in the past to utilize, instead of looking for new things to buy.  One of those items is the Provocraft Your Story laminating and book binding machine.  I bought it, but I have never "fired" it up.  One reason was the binders that went with it were very expensive.  And if I'm being honest, I was a little intimidated by it.  I was hoping to get it out this weekend and make something with it.  But life got in the way.  It was a holiday weekend and getting ready to celebrate with family took up the time I was hoping to have for crafting.  But it is still the next thing on my list to do.  I suppose if I had an actual project in mind, I would feel more excitement and urgency.  So today, I'll troll the internet and youtube to see if I can find some inspiration, and then I'll share that with you.

So, stayed tuned for some project on the Your Story and be sure to check the facebook page for the next giveaway!

Remember, Crafting on a budget means making beautiful things affordably!

But, What About Sublimation?

Six months ago, sublimation was all the craze.  Once people found out you could convert an Epson ecotank printer into a sublimation printer, you couldn't get your hands on one.  I know, I was part of the craze!  But what about sublimation now?  How do I feel about it?  I'm not going to lie, it isn't one of my favorite things.  Why?  Limitations.  The only sure way to get an excellent result is if you are sublimating on white 100% polyester.  Hey, guess what?  Not everyone is a fan of polyester.  And finding white polyester shirts has become as difficult as finding an Epson printer.  But you can sublimate on other things.  Mugs, tumblers, glitter vinyl and special heat transfer papers made for sublimation.  But buyer beware, there have been many reports of people getting mugs and tumblers on Amazon, that were not for sublimation.  To sublimate on any surface, there needs to be a poly coat applied to it first.  So the mugs you can buy at the hobby stores, next to the mug press by a company in Utah, have been specially treated to accept the sublimation ink, when heated to the correct temperature, under the correct pressure.  


Of course there are many companies that have blank substrates, like keychains, koozies, shot glasses, yard flags and even graduation stoles.  You can also buy phone cases and lighters to sublimate.  But that might not be an affordable option if you're trying to sell.  Shipping or minimum orders might make the price tag too high.  So what else can a person sublimate on?  A YouTube search will pull up quite a variety of things that people have sublimated and places to find cheap blanks.  One of my favorite stores for all things crafty is the Dollar Tree.  And I happen to be lucky enough to have 6 stores within a very close distance.  

One hack, that I have not tried yet, is to adhere a laminate sheet to a painters canvas, then sublimate on that to create a vibrant portrait or wall art.  This is something I plan on doing in the near future, to test.  I'll be sure to share the results here.  

Over the course of the next few weeks, I'll be looking for more ways to utilize my sublimation printer and to find more crafty ways to create.  Be sure to check back for updates!

Thursday, July 1, 2024

Facebook Giveaway Fun!

                Congratulations to our first giveaway winners!  


On June 28, 2024 I did a Facebook Live and drew 3 names for the above prizes.  These are 3D printed, ready to decorate mouse ears!  It was fun doing my first live and I plan on doing more.

There is another giveaway going on right now at https://www.facebook.com/ictcheapcrafts.  Don't miss out!

Tuesday, May 11, 2024

Spring Is Here


These lovely birdhouses are just a couple of the many 3d svg designs you'll find at Dreaming Tree.  With a few fun touches, like little birds and moss from the Dollar Tree and even a few of the silk flowers they have, you can have a beautiful gift for a friend or neighbor, or put a touch of sping in your home decor.


Mother's Day/Wedding Gift

Dollar Tree potholders and white vinyl from Stahls.  Split monogram from Caluya Designs on Etsy. Pressed with Cricut Easypress.


Wednesday, October 4, 2017

October Update!
Although I've been quiet on here, I have been pretty busy with a few projects.  They range from birthday t-shirts, to Halloween wreaths!  I thought I would take a few minutes to share them with you.

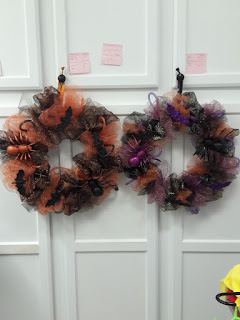
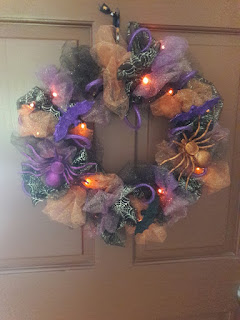
Made using the Crafters Corner sparkle tulle from Dollar Tree along with bats and spiders.  Lights were from my stash purchased 3 years ago at Hobby Lobby.

 Made with Dollar Tree sparkle tulle, bats spiders and led lights.

 I spent a day running around to several Dollar Tree stores in my area looking for the sparkle tulle, and the metal wreath rings to make these.  After watching a YouTube tutorial and seeing how easy it was, I wanted to make one for myself.  It's the top picture.  I then made one for my daughter and a son.  I was able to make these for a cost of about $10 each.  And they all have led lights.  It was fun, but very messy.  I have glitter everywhere.  The video is from 2016, and I didn't find the Halloween mesh, so I used the tulle.  I still love the way it turned out.

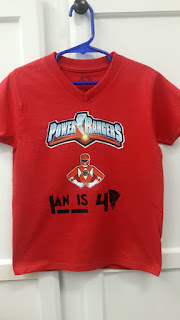
 Made using 3G jet-Opaque for the logo and Red Ranger, and black htv vinyl for the name.
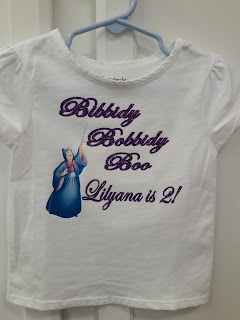
Made using the 3G Jet-Opaque for the Godmother and glitter htv for the saying.

I have also been designing and making t-shirts for birthdays.  I made one for my grandson's #2, (not pictured) and one for the son of a friend.  The "Cinderella" themed shirt is for my granddaughter.  I will also be making the svgcuts pumpkin carriage for a center piece.  I have made additional shirts for the grand kids, but I don't always think to take a picture before they are "worn away"!

In the mean time my massive paper collection is sitting idle wondering when I will start using it again, while my heat transfer vinyl collection is growing.  But I have my papers picked for the coach and I'll be cutting and gluing it this weekend. 

Thanks for stopping by!


Wednesday, May 3, 2017

Teacher Appreciation 2017

Can you believe it?   It's already May!   Are you scrambling for a last minute teacher appreciation gift?  I got the Oracal 651 out and sat down with ecal 2 and made this design for some of the teachers in our life.  I admit,  I had some trouble and had to remove,  re-cut and then reapply my design on a couple of these,  but FINALLY I got the look I was shooting for.
I finished them with some paper and foil shred.  If you make some using the Dollar Tree tumblers, be sure to include a note to handwash only.   Have fun creating!

Wednesday, April 26, 2017

Crazy about HTV!
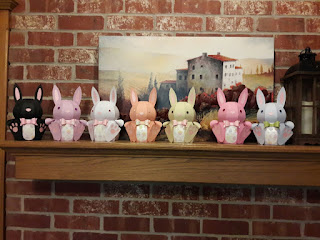
I've been very busy with little people this last year and a half.  But now that they are getting older and can entertain themselves for little bits of time, I find more crafting time.  I completed bunnies for Easter that I cut out last year but didn't have time to put together.  I was even able to cut a couple more for new babies.

This has been a very busy file for me.  I think I can safely say I've made more that 50 of these cute little guys!

But more recently, I've been hearing the call of vinyl.  It is a medium I have really wanted to learn more about.  I had ordered some heat transfer vinyl a couple of months ago, but didn't have the courage to try it.  I then decided I needed a heat press and so I bought myself a 15 x 15 clamshell from eBay.  Man, does it make this vinyl more fun to do!  I've tried my hands at a couple of projects, both with HTV and adhesive.  I've used the adhesive before, but with some improvements on the ecal 2 software, I think my projects are looking even better.  Here are the ones I've done over this last week.
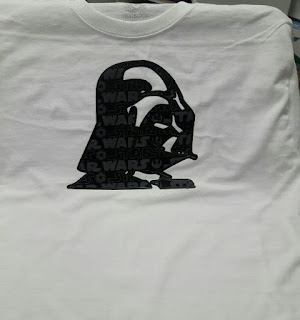
 This was my first htv project.  I cut the vinyl too deep and had to piece it all together on the shirt.  Not really the result I wanted, but a lesson learned.
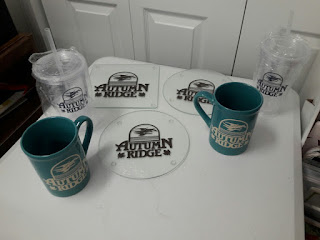
 I bought a bunch of these glass cutting boards/trivets at the Dollar Tree over a year ago, with the intent to etch or put vinyl on them for gifts.  I finally got a couple done along with my Dollar Tree tumblers and yes, these are Dollar Tree mugs.  I'll give these away in a drawing for our neighborhood work day this Saturday.


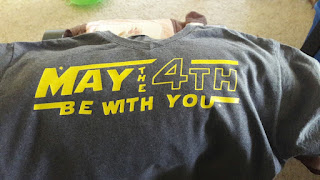
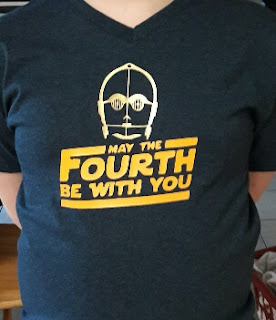
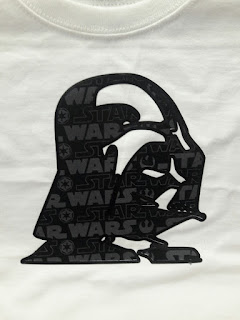
I tried my hand again at a different style Star Wars day shirt.  I had better results, by not cutting all the way thru the htv.  I think I need to work on sizing now.
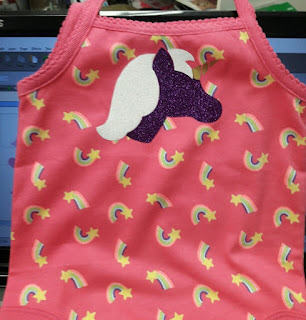
Now when I go to Wal-Mart, I'm on the look out for cheap apparel to add htv too.  I thought a unicorn was just what this little summer romper needed.  I'm getting better!

My last project today was inspired by some clearance fabric I found at Wal-mart.  I watched a tutorial on Cuttin Corners vinyl on applying heat bond ultra to fabric to make it like htv.  I then made a shadow cutout in black vinyl to edge it.  My placement was a little off.  I'm going to need better lighting by my heat press.  But I do love the look.  Now to see how long it will actually last!

Be sure to check out Betsy at Cuttin Corners vinyl, or the folks at Expression vinyl for great tutorials and ideas for using vinyl.  

Thanks for stopping by!

Friday, February 12, 2016

It's Been A While

Someone may be wondering where I disappeared to, so I thought I would take a minute and update by blog.  In September,  a new grandson was born.  Then in October, and new granddaughter was born.  I watch the grandson and his sister (who turns three in a few days) Monday through Friday and I watch the new granddaughter about 2 Saturdays each month.  That doesn't leave much time or energy for crafting these days.  I do manage to sneak in an item or two here and there.  I did make a free file from Dreaming Tree for preschool teachers.


It was quick and very easy, but looks so nice!  The papers are from my stash.  I got them several years ago.  Makingmemories Je t'adore.  And foil paper I found by chance at the Dollar Tree.   It's called Do It Yourself Projects Holographic and Foil Sheets by Jot.  It came with 20 sheets of varying colors.  I was shocked.  It cut very nicely.  The trim around the bottom was from Micheals.  It's called Fabulous Finds Adhesive Trim.  It's a really fun touch that looks so sparkly.  

I hope to get a rhythm back for more crafting soon.  

Thanks for stopping by!

Saturday, April 11, 2015

30 Days of crafting day 10

Today did not get the results I hoped for.  I was trying to do a scrapbook layout, but my computer and printer would not communicate.  After two hours getting pictures to print, my crafting time was over.  I hope to finish the layout and design a word album tomorrow.  Be sure to check on my progress!

Sunday, April 5, 2015

30 Day Challenge, Day 5 Happy Easter!

Today's post are projects I actually made last night in anticipation of not having time to craft today.

I used my Sizzix eclips2 to cut vinyl for these two tumblers that are bithday gifts later this week.  Both vinyls are oracal 651 that I purchased off ebay two years ago.  I was afraid to use it until now!  After watching a few youtube videos on how to apply it I have been less hesitant.  I'm very pleased with the outcome of these tumblers.  I bought a case of double wall tumblers from Dollar Tree.  This case had the summer colors.  It has the red and blue you see and a really nice green and orange.  I found the images on the internet under free svg searches and then did a trace into ecal2.  I love the wrapper feature!  It curves the words and design so your cup looks more professional.


 I have found for transferring the design from the mat to the project is really easy with some Dollar Tree Clear Magic Cover.  It's clear shelf paper that has just the right amount of sticky to make the transfer and you can see what you're doing.  

Thanks for stopping by and be sure to check out my facebook page.  I will be having a spring theme give away because we got to 200 page likes!

Monday, November 17, 2014

Crafting On A Budget-Making Something Personal

Christmas is getting closer!  Radio stations are playing Christmas music and the stores have been full of Christmas decorations for weeks!  My mind has been filled with Christmas projects as well!  But not every project is planned entirely of paper.  I know!  That's not what my name would suggest!  I do like to stray off the paper path every once in a while, just for something different to do.  This Christmas I have plans to add vinyl to the very popular plastic tumblers that everyone seems to carry around.

I made this one as a test to see how difficult it would be for me.  Working with the vinyl is a little challenging, but with more practice it will be easy.  This tumbler is from the Dollar Tree.  I bought the Oracal vinyl on ebay last year, but I'm just now getting around to using it.  I went ahead and ordered a case of the tumblers from Dollar Tree direct, so I wouldn't have a problem getting the number I needed.  Popular items can be hard to locate there, when you really want them!   These should be super cute and I'm sure the "giftees" will really enjoy them!

I watched a YouTube video made by Christopher Alan Designs on how to apply the vinyl.  Very helpful presentation.  I already had some clear transfer tape from my very first attempt at vinyl several years ago, but when I came across the Magic Cover clear contact paper he talks about, I bought 10 rolls! (at the Dollar Tree of course!)

For another project, I wanted to get more use from my Epiphany Crafts Shape Studio tools.  (I have acquired several of the shapes)  They were having a sale on Joann.com for the charms that go with the various shape studio tools.  

So, I bought some to go with my tools.  But...I wasn't sure what to do with them.  On another shopping trip to Michaels, I came across some bracelets that were only $2.49 each on sale.  They are made with the stretchy cord and had at least one dangle hanging off of them.  Light-bulb!  Take off the dangle they had and replace it with a charm!  Here is one of the bracelets I changed.


I also found some packages of heart charms and word charms that I added to this one.  I like the way it turned out and for such a budget price!  (less than $5.00)  

Another project I did recently (sorry I forgot to take pictures of it) for a guy was to take some pictures of a mutual relative (it was for the other grandfather) and make little "tool box" magnets from the epoxy shapes.  I also made the My Day with Dad toolbox to put them in.  I did change the tag from dad to the recipients name.  Another personal project that packs a big punch for such a budget price!

Just wanted to share these few easy, budget friendly projects to show that it doesn't cost a lot to show someone you care.  Just a little bit of your time to make it special!

Thanks for stopping by!  Be sure to like me on Facebook!

Tuesday, November 4, 2014

Crafting On A Budget-Dollar Tree Pre-Christmas Haul 11-4-2014

Hello Everyone.

I went to my local Dollar Tree today to stock up on essentials (face tissue, paper towels, baggies, bread).  I always cruise the other isles, because you just never know.  Today I made some fabulous finds, both for crafting and for gift giving!  Here they are!


On the counter are, Skylanders fun tape, burlap ribbon, laser tap,  some adorable compacts, a sweet Disney pen and pad set, and Christmas ribbon!  

They were stocking some really nice looking pics and floral things too!  I had to stop myself!
I love finding the compacts.  They go inside the Luxury Handbags from SVG Cuts nicely for a little extra special something.  These will be great for the younger gals.

I hunted at both Hobby Lobby and Michaels last week for Christmas ribbon for the Classic Christmas Advent Calendar from SVG Cuts.  I was only able to find the 2" wide ribbon or the 3/8" wide.  The ribbon I found at Dollar Tree was 5/8", which fits around the calendar better.  The 3/8" ribbon works, but the thicker ribbon helps hide any little imperfections.  
Not as many choices, but I'm not unhappy about the selection.

I'm also expecting a case of the plastic tumblers to personalize with some vinyl that I have been ignoring for a year!  Can't wait!  This is going to be a craf-tabulous Christmas for me!

Be sure to check out my Facebook page and "like" it.  I have a monthly give away. 


Thursday, September 18, 2014

Crafting on a Budget, and Making It Look Great!

This was a fun project to make.  It takes a lot of  paper, but it's super cute and fun to have out for Halloween.   But a project like this can really exhaust your crafting resources. and put a crimp in your craft budget.  I'm going to share a couple of tricks I used to help keep this beauty below budget.

1.  Use tissue paper instead of Velum.  Velum can cost over a dollar per sheet.  I can get an entire package of tissue paper at the Dollar Tree, for just a dollar!  I can't cut it on my machine, but it's not hard to hand cut the pieces.

2.  If your decorative panels are of a heavy, sturdy card stock, use lighter cheaper paper for the base.  It won't have the sturdiness you would get from a project made of all AC card stock, but no ones going to be living in it.  However,  if the decorative panels are of a cute paper, and not card stock, don't scrimp.  (On the roof I used a sturdy purple card stock and some cute Halloween paper I bought a couple of years ago at Michaels.)

3.  Skip additional embellishments.  This house has so much fabulous detail, it doesn't need any embellishment.  On the trim pieces I just inked and embossed.

4.  Mary at SVG Cuts, put a lot of thought into this project and included lining for the interior to finish if off nicely.  That's a wonderful touch, but I saved myself four pieces of paper by leaving them off.

5.  Don't go cheap on glue.  It is what holds your project together.  I like the quick drying glue from 3M.  Even though they changed the bottle and perhaps the formula, I still haven't found any I like better.  It doesn't make the paper wet like some glue does. It doesn't require much to get the job done. And once it's set, it is set!  (I buy it at Micheal's with a 40% off coupon)

6.  I buy most of my "holiday" papers after the holiday, when it's being cleared out.  So, yes, a lot of the projects I make are with last season's paper, or even several years ago.  But who really knows or cares.  I can get more bang for my buck by shopping clearance sales!

I realize that my tips will not change the course of crafting, but perhaps it will help a few of my fellow crafters enjoy more affordable crafting.  If you have a money saving tip, why not share?

Thanks for reading and craft happy!


Thursday, August 14, 2014

Crafting on a Budget.

Paper projects are fun to make, but paper can be expensive.  I have found some ways to make my paper pads go a little farther so I make sure to get my money's worth.  It helps me afford the svg kits I love to buy from SVG Cuts.  I would like to share some of my tips with you, so that you too can enjoy more crafting on a budget.

Today I'm sharing my love for The Dollar Tree!

I have found so many things at the Dollar Tree that I can use in my crafting.  And for $1 it is usually a savings over the craft stores or even Wal-Mart.  I did some shopping there this week for the first day of school teacher gifts I'm sending with the boys.  I bought some little note pads, pens and sticky notes.  With these few items, I'll fill up a desk set and it will be adorable, useful and cheap!  And each purchase will make more than one gift.

In the front is a pad of sticky notes.  I get one package of 5 and split them out.  The pens came 3 to a package.  Next are the cards that I made.  Behind the cards and their envelopes are two little lined note pads.  There are 5 pads in one package.  The last item is a really nice set of sticky notes that have standard size notes and little "flag" type notes.  I left them intact since they were just a $1!  To keep from using two pieces of the decorative card stock on the desk set, I cut the bottom piece from the same card stock as the green piece on top.  I was able to use the entire 12x12 sheet.  So, for these two sets, instead of using 5-6 sheets of card stock, I only used 3 sheets.  The apple is one, the one with the writing is two and the green for the border piece and bottom was three!  Even on the cards, I changed the size a little so I could cut two card bases from one piece of 8 1/2 x 11 card stock, instead of a 12x12.  I also save by using the thinner paper from the large paper pads for decorative panels.  

This is just one example of ways you can save on supplies and add-ons to keep gift items within budget.  I'll share more money saving tips in the future and would love to hear how you save too!


Be sure to visit my Facebook page and give me a like!  Thanks for stopping by! 


Older Posts Home

Have You Been Missing Out?

Below are the fun giveaways that have be going out the last few weeks.  Only 2 more Wednesdays until Christmas!  That means only 2 more give...