Showing posts with label Affordable crafts. Show all posts

Wednesday, October 4, 2017

October Update!

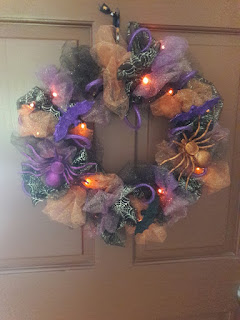
Although I've been quiet on here, I have been pretty busy with a few projects.  They range from birthday t-shirts, to Halloween wreaths!  I thought I would take a few minutes to share them with you.

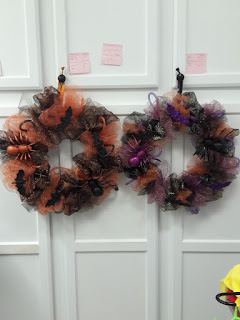
Made using the Crafters Corner sparkle tulle from Dollar Tree along with bats and spiders.  Lights were from my stash purchased 3 years ago at Hobby Lobby.

 Made with Dollar Tree sparkle tulle, bats spiders and led lights.

 I spent a day running around to several Dollar Tree stores in my area looking for the sparkle tulle, and the metal wreath rings to make these.  After watching a YouTube tutorial and seeing how easy it was, I wanted to make one for myself.  It's the top picture.  I then made one for my daughter and a son.  I was able to make these for a cost of about $10 each.  And they all have led lights.  It was fun, but very messy.  I have glitter everywhere.  The video is from 2016, and I didn't find the Halloween mesh, so I used the tulle.  I still love the way it turned out.

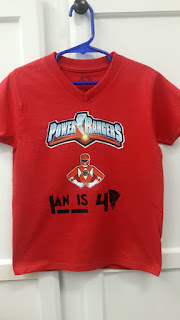
 Made using 3G jet-Opaque for the logo and Red Ranger, and black htv vinyl for the name.
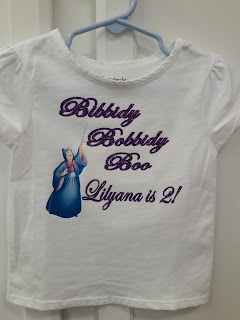
Made using the 3G Jet-Opaque for the Godmother and glitter htv for the saying.

I have also been designing and making t-shirts for birthdays.  I made one for my grandson's #2, (not pictured) and one for the son of a friend.  The "Cinderella" themed shirt is for my granddaughter.  I will also be making the svgcuts pumpkin carriage for a center piece.  I have made additional shirts for the grand kids, but I don't always think to take a picture before they are "worn away"!

In the mean time my massive paper collection is sitting idle wondering when I will start using it again, while my heat transfer vinyl collection is growing.  But I have my papers picked for the coach and I'll be cutting and gluing it this weekend. 

Thanks for stopping by!


Friday, February 12, 2016

It's Been A While

Someone may be wondering where I disappeared to, so I thought I would take a minute and update by blog.  In September,  a new grandson was born.  Then in October, and new granddaughter was born.  I watch the grandson and his sister (who turns three in a few days) Monday through Friday and I watch the new granddaughter about 2 Saturdays each month.  That doesn't leave much time or energy for crafting these days.  I do manage to sneak in an item or two here and there.  I did make a free file from Dreaming Tree for preschool teachers.


It was quick and very easy, but looks so nice!  The papers are from my stash.  I got them several years ago.  Makingmemories Je t'adore.  And foil paper I found by chance at the Dollar Tree.   It's called Do It Yourself Projects Holographic and Foil Sheets by Jot.  It came with 20 sheets of varying colors.  I was shocked.  It cut very nicely.  The trim around the bottom was from Micheals.  It's called Fabulous Finds Adhesive Trim.  It's a really fun touch that looks so sparkly.  

I hope to get a rhythm back for more crafting soon.  

Thanks for stopping by!

Friday, October 9, 2015

Black Cat Paperscape Box Card by Dreaming Tree (3D Svgs)


Today, in very little time, I made this super spooky paperscape box card by Dreaming Tree.  This was really fun to put together.  I did make a couple of changes to fit my desire to showcase some nice 2 sided paper I have by making memories.  I used the 2 sided paper as both base and panels.  In other words, I didn't cut out the panel pieces.  I did cut the fence out though, because I wanted the contrast. This is going to look great on the mantel all lit up tonight!  I'll be putting the other two together either later tonight or tomorrow!  

If you are wanting an easy but mind blowing project be sure to check them out (Click here)

Saturday, April 11, 2015

Day 11 of my 30 Day Challenge

I spent day 11 watching a video tutorial and then designing a word mini album.  Below is a picture of my prototype.

I downloaded the free font Cafe Rojo for the letters.  Watched a video by Krafting Kelly.  She uses the Silhouette Studio software, but I found it to be very similar to ecal 2.  Then made my own cut files.  I cut each letter out two times using AC cardstock.  I tried to use some chipboard I have, but it was way to thick.  I then used my Cinch to punch the holes and put in the wire binding ring.  Now it's ready to be decorated with pictures, sentiments and pretty embellishments.  And, I have learned a new and very useful skill today!  Which is what I was hoping to do during my 30 day challenge!  

Thanks for stopping by and be sure to drop by again!

Sunday, April 5, 2015

30 Day Challenge, Day 5 Happy Easter!

Today's post are projects I actually made last night in anticipation of not having time to craft today.

I used my Sizzix eclips2 to cut vinyl for these two tumblers that are bithday gifts later this week.  Both vinyls are oracal 651 that I purchased off ebay two years ago.  I was afraid to use it until now!  After watching a few youtube videos on how to apply it I have been less hesitant.  I'm very pleased with the outcome of these tumblers.  I bought a case of double wall tumblers from Dollar Tree.  This case had the summer colors.  It has the red and blue you see and a really nice green and orange.  I found the images on the internet under free svg searches and then did a trace into ecal2.  I love the wrapper feature!  It curves the words and design so your cup looks more professional.


 I have found for transferring the design from the mat to the project is really easy with some Dollar Tree Clear Magic Cover.  It's clear shelf paper that has just the right amount of sticky to make the transfer and you can see what you're doing.  

Thanks for stopping by and be sure to check out my facebook page.  I will be having a spring theme give away because we got to 200 page likes!

Saturday, April 4, 2015

30 Day Challenge, Day 4

WARNING!  This one hits high on the cute scale!

This egg from the Poplar Street Tulips by SVG Cuts is a favorite.  It always looks so good when it's finished!


This egg turned out too darn adorable!  The base is pink AC Cardstock.  The top panels are by We R Memory Keepers, Cotton Tails.  I got several sheets at Hobby Lobby in a clearance pack. Love it!  The bottom panels are from First Edition Papers.  The collection is called Spring Drop.  I'm going to be looking for that stack again.  It is sooooo cute.  

This egg is a hostess gift.  I was hesitant at first about the pink makng a statement, but I really do love how it turned out!  I think it will be well recieved!  

Tomorrow I will have a post, but I made the project a day early.  Hope you don't mind!

Thanks for stopping by.  Be sure to visit my facebook page and give me a like!

Friday, November 7, 2014

10 Reasons Why I Love SVG Cuts!

Today I got a  Facebook post from SVG Cuts alerting that there was a new free design available for download.  It just reaffirmed why I love SVG Cuts and have since Easter of 2010.
 This was a free file that they offered on 2-27-2010.  It is also the day I discovered how wonderful they are!  Below is what I made for a class of preschoolers for an Easter take home treat.  I had just gotten my Cricut Expression in December, and hadn't really done any crafting like this before.   SVG Cuts taught me a lot!

So today I thought I would share 10 reasons why I love SVG Cuts and only cut their kits.  Here goes...

1.  Free designs.  They currently have 318 free designs to download.  

2.  Great kits!  Every kit is carefully designed and tested to assure your crafting experience will be fun and rewarding.

3.  Tutorials.  All 3D projects have a video tutorial to help you assemble your project.  Mary also includes crafty tips and highlights tools to help make crafting more fun and special.  Because of her recommendations, I have gone out and purchased several crafty tools!

4.  Product reviews.  Leo has tested and reviewed all the new cutting machines that can cut SVG files whenever they come to market.  His reviews are thorough and unbiased.

5.  Customer service.  They set the bar high, and deliver the best customer service in the business.

6.  Personal interaction with customers.  If you have a question, you're going to get an answer from Leo.  If you have an issue, you're going to get support from Leo.  And if you're lucky, you might just get a "because I wanted to talk to you" phone call from Leo.  Not to mention the constant interaction Mary and Leo have with fans on Facebook.  

7.  Give aways.  Lots and lots of chances to win something.  Kits,cutting machines, gift cards, crafting tools, paper kits...the list goes on.  I'm sure a big Christmas give away is about to be announced.

8.  Affiliate program.  If you have a website or blog, you can sign up for the affiliate program and earn a commission from every sale your site generates.  

9.  How to videos.  Leo doesn't have to, but he makes videos to show us how to use different features in the Sure Cuts a Lot program/ecal.  He has also made videos to show how to download kits to the software for the new Cricut and for Silhouette.  These are wonderful value add items that don't generate revenue for them directly, but does have a positive impact on their business in the long run.  It's a win/win!

10. Community.  They have brought together a wonderful crafty community that can share ideas, and projects.  We support one another.  We cheer each other on.  We cry with each other.  We laugh with each other. They have given us a place to make friends with people all over the world, who share our passion for creating.  A place to belong.

If you haven't gone to the SVG Cuts website or Facebook page, then I encourage you to look them up and browse their pages for a bit.  I think you too will find your own 10 reason to love SVG Cuts!
Tuesday, November 4, 2014

Crafting On A Budget-Dollar Tree Pre-Christmas Haul 11-4-2014

Hello Everyone.

I went to my local Dollar Tree today to stock up on essentials (face tissue, paper towels, baggies, bread).  I always cruise the other isles, because you just never know.  Today I made some fabulous finds, both for crafting and for gift giving!  Here they are!


On the counter are, Skylanders fun tape, burlap ribbon, laser tap,  some adorable compacts, a sweet Disney pen and pad set, and Christmas ribbon!  

They were stocking some really nice looking pics and floral things too!  I had to stop myself!
I love finding the compacts.  They go inside the Luxury Handbags from SVG Cuts nicely for a little extra special something.  These will be great for the younger gals.

I hunted at both Hobby Lobby and Michaels last week for Christmas ribbon for the Classic Christmas Advent Calendar from SVG Cuts.  I was only able to find the 2" wide ribbon or the 3/8" wide.  The ribbon I found at Dollar Tree was 5/8", which fits around the calendar better.  The 3/8" ribbon works, but the thicker ribbon helps hide any little imperfections.  
Not as many choices, but I'm not unhappy about the selection.

I'm also expecting a case of the plastic tumblers to personalize with some vinyl that I have been ignoring for a year!  Can't wait!  This is going to be a craf-tabulous Christmas for me!

Be sure to check out my Facebook page and "like" it.  I have a monthly give away. 


Thursday, September 18, 2014

Crafting on a Budget, and Making It Look Great!

This was a fun project to make.  It takes a lot of  paper, but it's super cute and fun to have out for Halloween.   But a project like this can really exhaust your crafting resources. and put a crimp in your craft budget.  I'm going to share a couple of tricks I used to help keep this beauty below budget.

1.  Use tissue paper instead of Velum.  Velum can cost over a dollar per sheet.  I can get an entire package of tissue paper at the Dollar Tree, for just a dollar!  I can't cut it on my machine, but it's not hard to hand cut the pieces.

2.  If your decorative panels are of a heavy, sturdy card stock, use lighter cheaper paper for the base.  It won't have the sturdiness you would get from a project made of all AC card stock, but no ones going to be living in it.  However,  if the decorative panels are of a cute paper, and not card stock, don't scrimp.  (On the roof I used a sturdy purple card stock and some cute Halloween paper I bought a couple of years ago at Michaels.)

3.  Skip additional embellishments.  This house has so much fabulous detail, it doesn't need any embellishment.  On the trim pieces I just inked and embossed.

4.  Mary at SVG Cuts, put a lot of thought into this project and included lining for the interior to finish if off nicely.  That's a wonderful touch, but I saved myself four pieces of paper by leaving them off.

5.  Don't go cheap on glue.  It is what holds your project together.  I like the quick drying glue from 3M.  Even though they changed the bottle and perhaps the formula, I still haven't found any I like better.  It doesn't make the paper wet like some glue does. It doesn't require much to get the job done. And once it's set, it is set!  (I buy it at Micheal's with a 40% off coupon)

6.  I buy most of my "holiday" papers after the holiday, when it's being cleared out.  So, yes, a lot of the projects I make are with last season's paper, or even several years ago.  But who really knows or cares.  I can get more bang for my buck by shopping clearance sales!

I realize that my tips will not change the course of crafting, but perhaps it will help a few of my fellow crafters enjoy more affordable crafting.  If you have a money saving tip, why not share?

Thanks for reading and craft happy!


Friday, August 22, 2014

Giving something back better than you received it!

One of my grandsons was receiving tutoring over the summer, and the teacher sent a deck of vocab game cards home with us for further practice.  She asked us to return them when school started, so I thought it would be nice to dress them up a little and add a few tokens of appreciation.  I have been wanting to make the backpack from SVG Cuts Back to the Books kit, so I thought this would be a great way to tackle two issues.  1.  Returning the cards in better condition than we received them, and  2.  Making the backpack.

I put the cards and a couple of note pads, and sticker sheets into this little darling and sent it off with my grandson this morning.  I'm sure she loved it! 

As a side note:
I used 2 12x12 sheets of AC solid color card stock for the back pack.  One sheet of DCWV premium stack called The Grade School stack. The pocket on front was made from scraps.  The dot sheet from the Grade School stack, and the main pocket piece was from Making Memories Dilly Dally collection.  The button and letters are from Doodlebug Designs and the twine was from the bargain bin at Michael s.  I did ink the edges of the pocket and the panel.  I think I got is cut and assembled in about an hour.  Super easy.  Super cute!  

To keep my crafting costs down, I buy all of my paper stacks when they are on sale for 40-50% off.  I try not to buy online unless I'm getting free shipping.  I use to find great deals at Oh My Crafts, but they have gone out of business.  I now find a lot of great deals at JoAnn.com.  That is where I buy my AC card stock when it's half off.  And right now...
 10% off your total purchase + Free Shipping w/ $60 purchase*. Code DBLUP235 

Thank you for stopping by.  Please visit my Facebook page and give me a like!

All projects are cut using the Sizzix eclips version 1.

Thursday, August 14, 2014

Crafting on a Budget.

Paper projects are fun to make, but paper can be expensive.  I have found some ways to make my paper pads go a little farther so I make sure to get my money's worth.  It helps me afford the svg kits I love to buy from SVG Cuts.  I would like to share some of my tips with you, so that you too can enjoy more crafting on a budget.

Today I'm sharing my love for The Dollar Tree!

I have found so many things at the Dollar Tree that I can use in my crafting.  And for $1 it is usually a savings over the craft stores or even Wal-Mart.  I did some shopping there this week for the first day of school teacher gifts I'm sending with the boys.  I bought some little note pads, pens and sticky notes.  With these few items, I'll fill up a desk set and it will be adorable, useful and cheap!  And each purchase will make more than one gift.

In the front is a pad of sticky notes.  I get one package of 5 and split them out.  The pens came 3 to a package.  Next are the cards that I made.  Behind the cards and their envelopes are two little lined note pads.  There are 5 pads in one package.  The last item is a really nice set of sticky notes that have standard size notes and little "flag" type notes.  I left them intact since they were just a $1!  To keep from using two pieces of the decorative card stock on the desk set, I cut the bottom piece from the same card stock as the green piece on top.  I was able to use the entire 12x12 sheet.  So, for these two sets, instead of using 5-6 sheets of card stock, I only used 3 sheets.  The apple is one, the one with the writing is two and the green for the border piece and bottom was three!  Even on the cards, I changed the size a little so I could cut two card bases from one piece of 8 1/2 x 11 card stock, instead of a 12x12.  I also save by using the thinner paper from the large paper pads for decorative panels.  

This is just one example of ways you can save on supplies and add-ons to keep gift items within budget.  I'll share more money saving tips in the future and would love to hear how you save too!


Be sure to visit my Facebook page and give me a like!  Thanks for stopping by! 


Older Posts Home

Have You Been Missing Out?

Below are the fun giveaways that have be going out the last few weeks.  Only 2 more Wednesdays until Christmas!  That means only 2 more give...